Searching, Sorting, Customizing, and Navigating in FileTime
You'll find it much easier to find cases, filings, filers, etc. in FileTime if when you learn how to use our Searching, Sorting, Customizing, and Navigating features.
We designed FileTime data grids to provide you powerful tools to find specific records and customize the columns to better meet your needs. You will see the following features on nearly every page containing grids to display the data.
- Sorting Grids
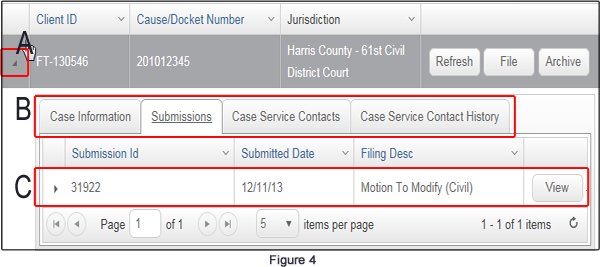
Click the
 icon (Figure 1, A) to open the options.
Click the Sort Ascending button (Figure 1, B) to organize all the rows of data in that column in Ascending order.
Click the Sort Descending button (Figure 1, C) to organize all the rows of data in that column in Descending order.
- Customizing Grid Columns
You can also control which columns display on your grids. The columns that are checked (Figure 1, E) will display. Let us know if you want to see other options and we can add them in a future update.
- Searching in Grids
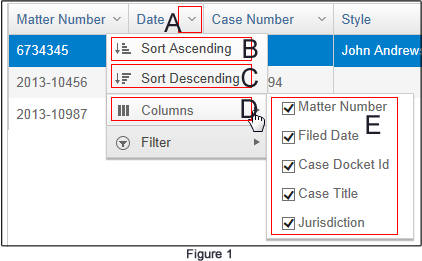
Clicking the Filter button (Figure 2, A) opens powerful search/filtering capabilities to you.
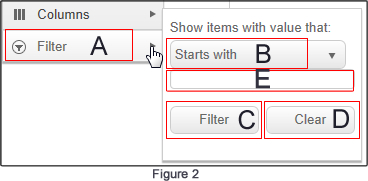
The Filter (Figure 2, B) button provides you four options:
- Starts with (Figure 3, A) - Select this choice and you will filter for any records that start with the data you enter in Figure 2, C.
- Is not equal to (Figure 3, B) - Select this option leave all records displayed on the grid except those that are equal to the data you enter into C.
- Is equal to (Figure 3, C) - Select this option and only records that are exact matches to what you enter into C will be displayed.
- Contains (Figure 3, D) - This option is often the most useful. Use is when you are not sure of the exact data you look up. This option causes FileTime to display and records with any part that matches the data you enter into C.
Enter your search criteria in the Filter Criteria field (Figure 2, E).
Depending on the Filter-type you selected in the previous step and the data column in which you are performing this search, you may need to enter the complete Case Style or just a few numbers of the matter number, as examples.
Click the Filter or Clear button.
Click the Filter button (Figure 2, D) to perform the search/filter. You will be returned to the grid with only the record or records matching your search/filter being displayed.
Click the Clear button (Figure 2, E) to clear all the selections you made above and start over.
- Drill Down
The Case Overviews page contains a drill down option that enable you to dig down inside each case and see a great deal of the case information without going to a new page.
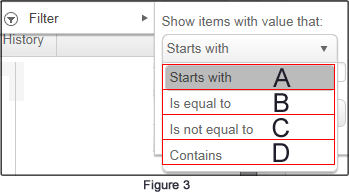
Click the
icon (Figure 4, A) in the left column of the row you wish to drill-down. That opens the case tabs for that case (Figure 4, B).
Click on each tab to view the information available:
- Case Information - Under this tab you will find basic information about the case.
- Submissions - You will find a list of submissions for the case under this tab. You will then be able to click to open the Details page for each submission.
- Case Service Contacts - Under this tab you can view all counsel for the case, including your firm’s service contacts and other counsel listed as service recipients.
- Case Service Contact History - Under this tab you will be able to view the Add and Delete history for all the service contacts to this case.
In the example above, the Submissions tab is clicked and FileTime displays the single submission for this case (Figure 4, C).